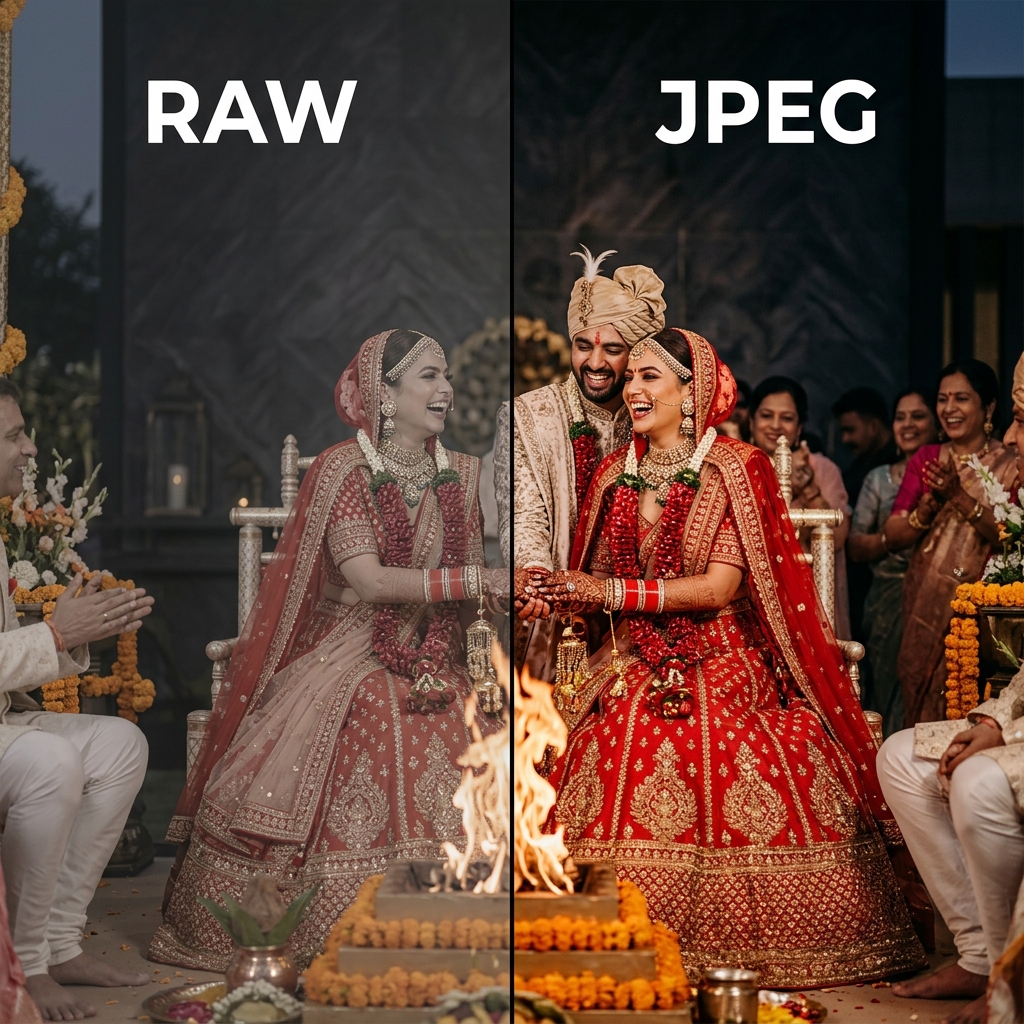
One of the most debated topics in wedding photography is whether to shoot in RAW or JPEG format. This comprehensive guide will help you understand both formats, their advantages and disadvantages, and when to use each for optimal results in your wedding photography business.
Quick Answer
Professional wedding photographers typically shoot in RAW format for maximum editing flexibility and image quality. However, there are situations where JPEG or RAW+JPEG mode makes more sense. Let's dive deep into why.
What Are RAW and JPEG Formats?
Understanding RAW Files
RAW is an uncompressed image format that captures all the data from your camera's sensor without any processing. Think of it as a digital negative – it contains all the information captured by your camera, giving you maximum flexibility during post-processing.
Common RAW file extensions include:
- .CR2, .CR3 – Canon cameras
- .NEF – Nikon cameras
- .ARW – Sony cameras
- .RAF – Fujifilm cameras
- .DNG – Adobe's universal RAW format
Understanding JPEG Files
JPEG (Joint Photographic Experts Group) is a compressed image format that processes and compresses the image data in-camera. Your camera applies settings like white balance, sharpening, contrast, and saturation, then compresses the file to save space.
While JPEGs are smaller and ready to share immediately, they contain less data than RAW files, which limits how much you can edit them without quality loss.
RAW Format: Maximum Quality & Flexibility
1. Unmatched Editing Flexibility
RAW files give you incredible control in post-processing. You can adjust exposure by ±3-5 stops without significant quality loss, recover blown highlights, lift crushed shadows, and completely change the white balance – all without degrading image quality.
Real-World Example
During a wedding reception in a dimly lit hall, you accidentally underexpose a crucial first dance shot by 2 stops. With a RAW file, you can recover this image perfectly in Lightroom. With JPEG, the image would be virtually unusable due to excessive noise and loss of crucial detail.
2. Superior Color Depth
RAW files typically capture 12-14 bit color depth (4,096 to 16,384 tones per color channel) compared to JPEG's 8-bit (256 tones per channel). This translates to:
- 68.7 billion colors (14-bit RAW) vs 16.8 million colors (8-bit JPEG)
- Smoother gradients in skies and backgrounds
- Better skin tone rendering
- More natural color transitions
3. Non-Destructive Editing
When you edit a RAW file, the original data remains untouched. Your adjustments are saved as instructions (in XMP sidecar files or Lightroom catalogs), allowing you to:
- Return to the original image anytime you wish
- Create multiple versions from one single RAW file
- Experiment fearlessly with different editing styles
- Update your edits years later with new software capabilities
4. Better Highlight and Shadow Recovery
RAW files excel at recovering details in overexposed (bright) and underexposed (dark) areas. This is crucial in wedding photography where you're constantly dealing with:
- Bright white wedding dresses against dark backgrounds
- Dark black tuxedos beside glowing window light
- Mixed lighting scenarios (outdoor + indoor simultaneously)
- Intense backlighting situations during golden hour
RAW Advantages
- Maximum image quality
- Extensive editing flexibility
- Better dynamic range
- Non-destructive workflow
- Professional results
- Future-proof archiving
RAW Disadvantages
- Large file sizes (25-50MB each)
- Requires heavy post-processing
- Slower write speeds in-camera
- Not shareable straight out of camera
- Requires significant storage space
JPEG Format: Speed & Convenience
1. Smaller File Sizes
JPEG files are typically 5-10x smaller than RAW files. A typical comparison looks like this:
- RAW file: 25-50 MB per image
- JPEG file: 3-8 MB per image
For a standard 500-photo wedding delivery, this means RAW takes about 12.5-25 GB of storage space, whereas JPEG only takes 1.5-4 GB.
2. Instant Sharing
JPEG files are ready to share completely immediately after shooting. This is perfect for:
- Social media sneak peeks natively during the wedding
- Quick previews to show the excited couple
- Emergency situations where clients need photos right away
- Second shooters sending you quick updates
3. Faster Workflow
Shooting JPEG heavily speeds up your workflow in multiple ways:
- Faster camera buffer clearing allowing more continuous frames
- Dramatically quicker image transfer to your computer
- Less time spent waiting on basic computer adjustments rendering
- Instant backup execution (smaller files move much faster)
JPEG Advantages
- Very small file sizes
- Instantly shareable
- Universal device compatibility
- Considerably faster workflow
- Significantly less storage needed
JPEG Disadvantages
- Extremely limited editing flexibility
- Lossy image compression
- Less color depth (8-bit)
- Greatly reduced dynamic range
- Can't easily recover blown highlights
Comprehensive Comparison
| Feature | RAW Format | JPEG Format |
|---|---|---|
| File Size | 25-50 MB | 3-8 MB |
| Color Depth | 12-14 bit (68.7 billion colors) | 8 bit (16.8 million colors) |
| Editing Flexibility | Extensive (±5 stops exposure) | Limited (±1-2 stops) |
| Compression Quality | Lossless (no detail loss) | Lossy (compresses detail) |
| Highlight Recovery | Excellent (2-3 stops) | Very Limited (0.5-1 stop) |
| Shadow Recovery | Excellent (minimal total noise) | Poor (very noisy results) |
| Primary Use Case | Professional work, maximizing quality | Quick edits, native previews, social |
Best Practices in Wedding Photography
Scenario 1: Main Wedding Ceremony (Always Use RAW)
The ceremony is the most pivotal part of the wedding. You get one chance to capture critical moments perfectly like the vows, ring exchange, and first kiss. Shooting RAW natively ensures you can fix any sudden exposure mistakes, get maximum color flexibility across erratic lighting, and deliver the best high-resolution quality.
Scenario 2: Reception Candid Shots (RAW+JPEG or JPEG)
During a busy reception, you're shooting hundreds of candid moments fast. JPEG is acceptable here purely because the faster buffer clearing unlocks more continuous shots. However, most pros still utilize RAW+JPEG as a safe fallback just in case the flash fails to fire during a critical dance.
The Recommended Approach: RAW+JPEG Mode
Without a doubt, most high-end professionals utilize RAW+JPEG mode simultaneously. This requires higher storage space initially but offers the best of both worlds. You retain the RAW file securely for deep editing, and have a JPEG instantly ready for previews to blow your client away that same night. Dual card slots on professional cameras make writing these simultaneously seamless.
Expert Tips & Best Practices
1. Master Exposure "In-Camera" First
While RAW provides an invisible safety net, do not mistakenly rely on "fixing it in post." Nailing your exposure natively in-camera leads to phenomenally cleaner images with no noticeable noise, utilizes your sensor's entire dynamic range correctly, and speeds up your editing significantly.
2. Invest in Speed Over Capacity
If shooting RAW+JPEG, the bottleneck will be your SD/CF card write speeds. A slow card will cause your buffer to jam during a fast-paced first dance. Always invest in top-tier UHS-II class cards or CFexpress, even if they have slightly less total capacity. Focus on write bandwidth.
Mistakes That Cost Photographers
- Shooting JPEG intentionally to save money: You literally cannot undo this decision if lighting goes horribly wrong.
- No rigid backup strategy: Deleting photos from cards before copying to two external hard drives securely.
- Using cheap memory cards: Saving $30 on a generic SD card but risking heavy data corruption of a priceless wedding event.
The Final Verdict
The professional standard across the industry is to utilize RAW+JPEG simultaneously. Storage is the cheapest it has ever been. Sacrificing the phenomenal safety and quality of RAW formats solely to save hard drive space is a risk a professional wedding photographer should simply never take.
Try Pixelect For Free Today